Well sheltering from the rain is fun.Still after a good few days of fine dry weather a good soaking won't go amiss, as long as it doesn't hang around too long.
I really have to get the Brassica cage up this week as my cold frame is starting to bulge with seedlings ready to go in.
The potting shed extension has really paid dividends and I'm looking at trays of stuff waiting to go in. I've already planted 2 lots of Peas and Broad Beans with another lot coming along. I've earthed up the Asparagus bed and got the First & Second Early Potatoes in. The Purple Sprouting Brocolli is coming to an end soon and I'll be needing the space for my Sweet Corn.
The Garlic is looking good and hopefully the Japanese Onions will start to expand soon.
I've sown a tray of Leeks and they're getting quite big now so I'll be transplanting them into their permanent bed soon.
The subject of Asparagus and smelly wee is quite interesting with a few websites devoted to the discussion. Well at least my kidneys seem to be functioning OK!
Talking of Asparagus, there's some fabulous local grown in the shops right now so this weeks recipe reflects that. (I will have to wait for 2 years before I can sample some of my own!)
Enjoy,
The Captain.
Sautéed Asparagus with Garlic
You will need:
Bunch of fresh Asparagus.
Olive Oil.
Balsamic Vinegar
Garlic
Grated Parmesan Cheese,
Salt & Pepper to taste.
First blanch the asparagus. (This keeps it from going grey when you cook it!)
To blanch; bring a pot of water to a boil and season with salt. Fill a large mixing bowl with ice and cold water. Place asparagus in boiling water for about a minute then remove and put in ice water. Let it sit for a few minutes and then remove, pat dry
Saute using olive oil, a tbsp. of balsamic vinegar and a tbsp. of minced garlic.
Using a non-stick frying pan, stir fry/toss it for 3 - 4 minutes.
When it's ready, sprinkle with fresh grated parmesan cheese, salt and pepper.
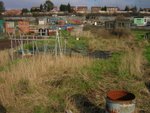
Just an update from Monday's broadcast, I was down at the plot with my old mate "Lard" and thought I'd illustrate my various comments a bit more.
My "Dustbin Spuds" are through and I'll add some more compost in a couple of days.
I've started the "Parsley Project". The 4 rows of seeds are, from the left, 1) seeds kept in the fridge for a week, 2) Boiling water poured in the drill, 3) The Captain's wee poured on the seeds, 4) just normal seeds.
I've got my first Strawberry flower!
And in the final picture, 36 slabs!!!
This weekend I intend to get my Brassica cage ready weather permitting.
Sorry for the delay in getting the broadcast up on the blogspot. I spent yesterday barrowing a jumbo bag of sand into the corporate area. Then laying 36 very heavy slabs and as a result I think my arms have grown at least 2 inches. Thanks also to Her Cissyness for the invaluable help! I'll post some pics of the new construction along with the forthcoming brassica cage ASAP. The weather was unbelievable, so much so I burnt me napper! I did manage another half row of Earlies and a half row of 2nd Earlies. The cold frame is bursting with seedlings so it's full on down at No87. Peas & Broad Beans are going in from the loo roll sowings. I'm making a real effort to stagger sowings this year. The first shoots of Asparagus are poking through so they'll need more soil on top, and the first shoots of my spud bin are through as well. The recipe this week is quite daunting with so much Garlic, but it really works. Well worth a try.
Enjoy,
The Captain
Chicken with 40 cloves of garlic
Serves 6
Ingredients
1.8kg organic, free-range chicken
Maldon sea salt flakes
Freshly ground black pepper
1 tbsp herbes de Provence or 6 sprigs rosemary /6 sprigs thyme /2 bay leaves
1 lemon
4 garlic bulbs/40 large cloves
250-500ml fruity olive oil
You will also need a large sheet of kitchen foil
Method
Heat the oven to 200C/gas mark 6. Un-truss the chicken.Lavishly season inside the cavity with salt and pepper. Place 2 sprigs rosemary and thyme inside the cavity with 2 strips of lemon zest. Place the chicken, breast side uppermost, in a large, lidded casserole dish that holds the chicken snugly.
Separate the garlic cloves; there is an average 10 cloves per bulb, sometimes more. Flake away the excessive papery skin but do not peel the cloves. Scatter the cloves around the chicken. Pour the olive oil over the chicken so it trickles down to cover the garlic more or less. Tuck the remaining rosemary and thyme, and bay leaves, over and around bird and garlic. Season with salt and pepper. Place a double fold of foil over the dish with a generous overhang. Position the lid and use the foil overhang to seal thoroughly.
Place the dish in the middle of the oven. Turn the temperature down to 180C/gas mark 4. Cook for 90 minutes. Remove from the oven. Rest for at least 10 minutes - it will keep without harming for 30 minutes - before transferring to a warmed platter. Spoon the olive oil and garlic over the top, so they tumble down the bird. Serve with a share of the garlic and olive oil with boiled potatoes and a green vegetable such as chard on the side.
Happy Easter to all my friends! I hope the weather has treated you well and that you've all been able to get out on the land. I spent a very pleasant weekend planting my Asparagus crowns which arrived on Saturday morning. Heeding the advice to plant ASAP I got stuck in and dug out 2 trenches, made a mound of compost/sieved soil and then covered them in more sieved soil. I just have to patiently wait for a couple of years before I can try them.
I mentioned in a previous blog about growing Parsley and in particular 3 different ways suggested by readers of The Times. One is to put the seeds in the fridge for a week, Two was to pour hot water in the drill and the third was to soak the seeds in urine (Male of course!) Well I've prepared a bed especially for the experiment as can be seen in the picture using a bag of B&M multi-purpose compost. The seeds are Plain Leaved 2 from B&Q at 98p and I've split the packet into 3. The first lot are in the fridge and next week I'll sow them at the same time as the other 2 methods. Has anyone else done the trick of cracking the Coriander seeds? Here's proof of what the guy said on TV a couple of years ago on Gardeners World from an allotment site in Birmingham. If you carefully crack the coriander seed there are 2 seeds inside. So, without cracking them I sowed 5 seeds in the pot. And there are 10 seedlings! I know it's time consuming, but isn't that's what having an allotment is all about?????
Recipe: Baked Camembert
Here's a really nice way to bake Camembert as a starter or even a light snack.
Ingredients Camembert cheese in a wooden box. (Lidl or Aldi is the cheapest!) Clove of Garlic. Cut in half. Tablespoon of Dry White wine.
Take the cheese out of the box and remove the plastic wrapping. MOST IMPORTANT! Put the cheese back into the box and rub the surface with the cut Garlic clove. Make a few small holes in the cheese and drizzle the white wine into the cheese. Put the lid back on and bake in a hot oven, 200C for about 25 mins or until soft and runny.
To serve, remove the lid and scoop out the cheese with carrot or celery sticks, crackers or bread sticks.
What a fabulous weekend. I managed to get in half a row of earlies, Arran Pilot. I'm seriously trying to stagger everything this year to avoid gluts. Also sowed loads of brassicas, sweetcorn and herbs and tidied up the plot. I've also used an old dustbin for a potato barrel. Just banged a load of holes in the base and put about 4" of compost from B&M (used to be Woolies), then 5 seed potatoes and then another 2"-3" of compost. I'm picking some lovely Purple Sprouting Broccoli. It's so much tastier than the supermarket stuff and is picked and on the plate within the hour. This is Ethel & Cecil who made an appearance at the weekend. It's amazing who you meet down on the land at times!
And here's a Spider from Mars! I found this in the cupboard in a bag I'd obviously forgotten about. I do have an issue with some of the shops selling seed potatoes with similar growths. Obviously stored at too high a temperature and with no thought. Avoid at all costs.
Congratulations to "allot of veg" who correctly identified last weeks mystery object as a Rhubarb flower.The full picture is seen here.It's amazing the colour of flowers vegetables and fruit have.
The recipe this week is courtesy of a great friend who is an actor in LA. This can be adapted to different themes by using alternative beers and rubs. It's really tasty and certainly a talking point.
1/4 cup coarse salt (kosher or sea)
1/4 cup dark brown sugar
1/4 cup sweet paprika
2 tablespoons freshly ground black pepper
Put the salt, brown sugar, paprika, and pepper in a small bowl and stir to mix.
First, pop the tab off the beer can and drink half of the beer!
Make 2 additional holes in the can just above halfway. Set the can of beer aside. Remove the packet of giblets from the body cavity of the chicken and set aside for another use. Remove and discard the fat just inside the body and neck cavities. Rinse the chicken, inside and out, under cold running water and then drain and blot dry, inside and out, with paper towels. Sprinkle 1 teaspoon of the rub inside the body cavity and 1/2 teaspoon inside the neck cavity of the chicken. Drizzle the oil over the outside of the bird and rub or brush it all over the skin. Sprinkle the outside of the bird with 1 tablespoon of rub and rub it all over the skin. Spoon the remaining 1 1/2 teaspoons of rub into the beer through a hole in the top of the can. Don’t worry if the beer foams up: This is normal.
Hold the bird upright, with the opening of the body cavity at the bottom, and lower it onto the beer can so the can fits into the cavity. Pull the chicken legs forward to form a sort of tripod, so the bird stands upright. The rear leg of the tripod is the beer can.
Stand the chicken up in the center of the hot grill, over the drip pan and away from the heat. Cover the grill and cook the chicken until the skin is a dark golden brown and very crisp and the meat is cooked through (about 180F on an instant-read meat thermometer inserted in the thickest part of a thigh, but not touching the bone), 75mins to 90mins. If using a charcoal grill, you’ll need to add fresh coals either side after 1 hour. If the chicken skin starts to brown too much, loosely tent the bird with aluminum foil.
Using tongs, hold the bird by the can and carefully transfer it in an upright position to a platter. If cooking on a roaster: Use oven mitts or pot holders to remove the bird from the grill
Present the bird to your guests. Let the chicken rest for 5 minutes, then carefully lift it off its support. Take care not to spill the hot beer or otherwise burn yourself. Halve, quarter, or carve the chicken and serve.
(This works just as well in the oven by standing the chicken in a roasting tray on the oven bottom)
Here are some alternative ideas,
The Roppongi Roaster
RUB
1/4 cup dark miso paste
2 tablespoons brown sugar
1 tablespoon sesame seeds
2 teaspoons grated fresh ginger
1 teaspoon wasabi paste
1/2 teaspoon Asian sesame oil
CAN
12-ounce can of Sapporo (drink half, use the rest here!)
1/3 cup rice vinegar
a chunk of ginger
Toscana in a Can
RUB
3 tablespoons chopped fresh rosemary
2 tablespoons brown sugar
2 tablespoons diced prosciutto
2 tablespoons olive oil
CAN
6 ounces Prosecco poured into an empty 12-ounce beer can


